Photoshop recently got an upgrade called Linked Smart Objects which gets us closer to a true non-destructive workflow between Lightroom and Photoshop. Until now I’ve chosen not to use Lightroom as a part of my regular Photoshop workflow because of the lack of a true non-destructive workflow. Last June I tried out the then-new versions of Photoshop and Lightroom but was disappointed by this lack as I described in this post: Photoshop CC – Lightroom 5 Workflow. The problem was the fact that when you edit a file in Photoshop any adjustments you previously made in Lightroom are destructively written into the TIFF or PSD file. After editing in Photoshop you can make further edits in Lightroom—but you cannot undo or alter your previous Lightroom edits.
Now, with the use of Linked Smart Objects we do have the ability to edit a file in Lightroom, open and edit it in Photoshop and then make further edits to the original Lightroom edits back in Lightroom. This enables a true non-destructive, round-trip workflow which allows any number of edits in Lightroom without needing to commit the changes destructively into the TIFF/PSD file. The bad news is that the procedure for taking advantage of this feature is cumbersome. Adobe evangelist Terry White’s post How To Take Advantage of Linked Smart Objects in Photoshop CC demonstrates the procedure. Briefly, it involves these steps:
- Edit the file, typically a raw file, in Lightroom.
- Switch to Photoshop and manually create a new image file.
- Place the edited file into the new Photoshop file and continue editing. Now, you can switch back and forth between Lightroom and Photoshop continuously working non-destructively.
There are three major problems with that procedure:
- You can’t do “Edit in Photoshop” from Lightroom like you would normally do. After editing in Lightroom you have to go to Photoshop and use the Place command. I’ll elaborate on this below.
- You have to manually enter the image size when creating the new file in Photoshop. If you have cropped the image in Lightroom you have to be sure to use the cropped size.
- Your new image file doesn’t show up in Lightroom automatically. If you want to see it there you have to import it.
Can’t “Edit in Photoshop”
To take advantage of linked Smart Objects you have to use Photoshop’s File –> Place Linked command. So, instead of making your initial edits in Lightroom and then going straight into Photoshop you have to instead switch to Photoshop manually. By itself, that’s no big deal. But, next you have to choose the File –> Place command and then manually navigate to the file you were just editing in Lightroom.
But First You Have to Create a New File
But, wait, you can’t just use the Photoshop File –> Place command to create a new image. First, you have to create a new image with File –> New. Not too hard but you also have to specify the correct dimensions. If you always shoot with just one camera you may already have those numbers memorized. But if you have two cameras and a phone, like me, you have three sets of numbers to remember.
It gets worse. If you’ve cropped the photo in Lightroom you have to use the cropped dimensions. You have to read them in Lightroom and then you have to manually enter them in Photoshop.
After creating a new empty image and navigating to the desired Lightroom-edited file & selecting it, Photoshop pops open the Camera Raw dialog (if you’re opening a raw file as you will probably be doing). You need to click the OK button to get past this. Again, no big deal, just one more unnecessary step.
Then you then have to drag out the preview of the file to be placed so that it fills the empty window. Of course, you have to Shift-drag each image corner to the corresponding window corner to fill the window exactly. (This can actually be difficult to do with large files where you can easily get two- or three-pixel errors.) Otherwise, you’ll have a very slightly resized image and, possibly, white slivers along one or more edges.
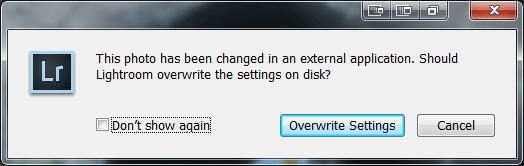
Now, you’ve got a Lightroom-adjusted file open in Photoshop. You can make your desired edits in Photoshop. Finally, the payoff. You can now go back to Lightroom and make further edits to the original raw file. You can even alter your original edits (but not the cropping!) But you do have to remember to press Ctrl/Cmd-S to save your metadata edits so that Photoshop gets notified that its linked Smart Object has changed. And you also have to click Overwrite Settings on the dialog below:
Now, when you go back to Photoshop it will automatically update its linked instance of the image with your further changes from Lightroom. That’s so great!
Import into Lightroom
What’s not so great is that before your TIFF or PSD file will show up in Lightroom you have to manually import it. But after you do that you now have two linked, but separate documents. If you want to make further changes in Lightroom you have to edit the original file (typically, a raw file) and not the one you edited in Photoshop (PSD/TIFF). And if you want to make further changes in Photoshop you have to remember to open that file and not the original.
Please, Adobe, Finish the Job

With this latest update Adobe has put into place the essential technology that would enable a true non-destructive workflow between Lightroom and Photoshop. This technology allows any number of round trips from Lightroom to Photoshop and back again. We’re so close to the holy grail that I described in my previous post that I’m wondering why Adobe didn’t go all the way. Although we now have in our hands the technology to achieve the goal it’s so awkward and error-prone that it’s really not practical.
I have to assume that Adobe realizes how useful this could be for those of us who will always love Photoshop. And maybe the release of new versions of Lightroom and Photoshop with a seamless interface between the two is right around the corner. But, if not, please Adobe, hear my plea. Lightroom is great. Photoshop is great. A true, non-destructive, automated workflow for the two would be REALLY, REALLY, REALLY great!
Comments 4
I just ran across your blog post here and I’ve been wondering about this myself. I’ve discovered the following, which makes the procedure quite a bit less cumbersome:
– From Lightroom, select your photo and choose Edit In | Open as Smart Object in Photoshop…
– Of course, this opens the file in Photoshop as an embedded smart object. In photoshop, select the smart object layer, go to the Properties panel and click the “Convert to LInked” button.
– The normal file save dialog opens. Navigate to the folder where your original photo (a .NEF raw file in my case) is stored and click save. A warning dialog asking if you want to replace the file will appear. Click “Yes”. As far as I can determine, this does not cause any problem for the original raw file: the size of the file does not change, but the file system’s modification date/time is updated. Even though you’ve told it to replace the raw file, it seems that photoshop is really just saving the path to the file and not actually changing the raw file.
– at this point, when you save your file in photoshop (psd or tiff depending on your lightroom settings), it will automatically be imported into lightroom and stacked with the original raw.
So, still not as streamlined as it should be, but better than the original procedure you described.
Author
Mark,
Thanks for this tip. At this point, personally, I’m still in the Adobe Bridge and Photoshop camp although I do still find myself drawn into Lightroom at times; e.g., when I need to tether.
Regards,
Dave
Hi Mark,
Since I’m using Adobe CC I have added Photoshop to my workflow. That has lead me to your great article. Thank you so much for sharing.
I like to comment that the action of saving the changes made in Lightroom by the addiitional CMD+S is depended on the settings in the Lightroom Catalog. There is an option to immediately write changes to the XMP sidecar file, hence, the DNG file.
This is a sulotion that I’m definitely going to try out. I do still see a missing part in this process. Looking at my own file processing I mostly do the following step:
1 – Prepare the RAW file in Lightroom by doing basic adjustments.
2 – Making creative adjustments in Photoshop via the “Edit in Photoshop” option.
3 – Finalizing (i.e. adding a vignette) in Lightroom on the Photoshop file.
4 – Export the file from Lightroom.
Step 3 is the one that prevents from re-editing the Photoshop file again withhout loosing the finalization adjustments made in Lightroom. To me, once going to Photoshop, the additional finalization steps must also be done in Photoshop. Not this cannot be done in Photoshop but some things can be done way more easier in Lightroom.
And I did not even mention the cropping and/or rotation adjustments.
Do you have any tips/suggestions on how to deal finalization adjustments and keeping a non-destructive workflow?
With lots of greetings,
Dennis
Author
Dennis,
I’ve been trying out Lightroom 6 recently to see if it has made the Photoshop round-tripping workflow any easier. So far, I don’t see any sign that it has. As before, saving a file in Photoshop locks in any changes previously made in Lightroom. If you go back to Lightroom to re-edit those changes in a PSD or TIF you cannot change those original settings.
I’ll be looking more closely at LR6 during the coming weeks just in case I’ve missed anything. If I find a better way I’ll write a new post.
Dave